Baked Potato Soup

TaterSoup

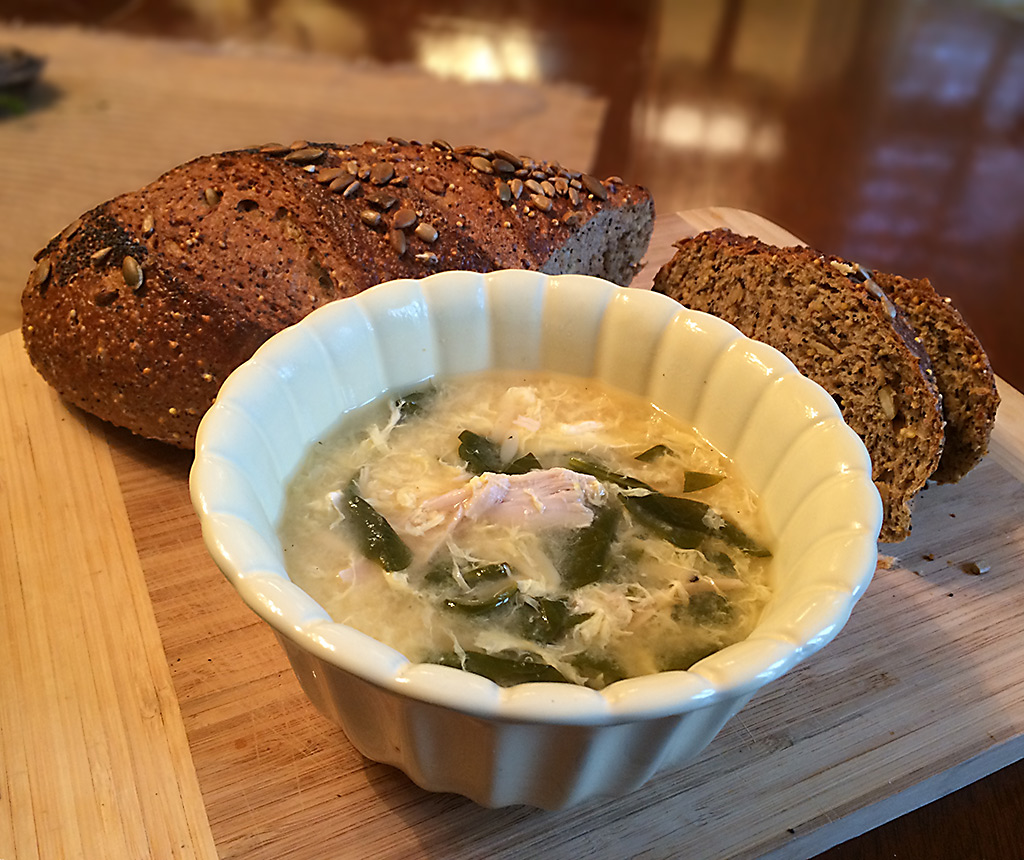
At Poppy’s house we eat soup all year round, at least twice a week. But there are days, like today, where the temperature won’t move up to freezing and will end in single digits. This type of weather doesn’t just suggest a hot hearty soup, it demands it!

This is Poppy’s version of “Baked Potato Soup.” No, you don’t have to bake the potatoes. This soup just contains all the good stuff you might use to top a baked potato (minus the sour cream and butter). It’s easy, but does take a little time. Turn on some good music, pour yourself a glass of wine and lets get cooking.

Ingrediants


Ingredients: 

  • 48 ozs. of low-sodium chicken broth
  • 6-7 medium Yukon Gold potatoes
  • 6-7 ozs. of grated sharp cheddar
  • 3/4’s of a large sweet onion
  • 3 stalks of celery
  • 1/4 pint cream
  • 3-4 dashes of Frank’s hot sauce
  • 4-5 slices crumbled peppered bacon
  • Bunch of green onions
  • Coarse ground black pepper to taste

I start by cooking the bacon. My preferred method is baking it in the oven, on a cookie sheet lined with foil. This makes the clean up incredibly easy and yields evenly cooked bacon. I set my convection oven at 350°, cook for 10 minutes, then flip and cook for another 5-6 minutes. Remove the bacon, sandwich it between several paper towels to soak up any excess grease then set aside.

Bacon

While the bacon is cooking, peel and dice 6-7 Yukon Gold potatoes or the equivalent. Toss the taters into the chicken broth and start them cooking. Dice the celery and onion and sauté in a mix of EVOO and butter, about two tablespoons apiece. Cook the onion celery mixture until the onions are translucent. Add the onion-celery mix to the potatoes and cook until the potatoes are tender.

I like my potato soup a little creamy and a little chunky. Tonight I used an immersion blender until I got that right balance (you can add the cream before or after blending). Once you have achieved the right balance between creamy and chunky add 3-4 slices of crumbled bacon, reserving some for topping. Same with the grated sharp cheddar. Add 5-6 ozs. of sharp cheddar, reserving some for topping. Toss in 3-4 dashes of hot sauce (trust Poppy, this will not burn your mouth, it just ups the flavor). Add at least a teaspoon of coarse black pepper (I add more).

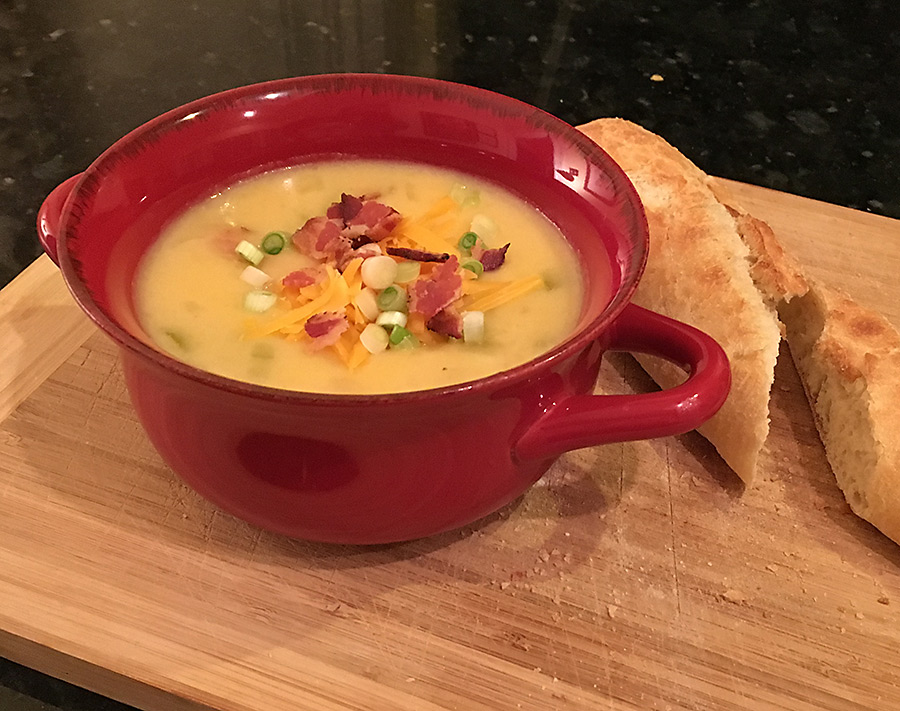
Simmer for a few minutes to let all the ingredients and flavors become acquainted with each other, fill your soup bowls then top with a hefty pinch of crumbled bacon, grated cheddar and green onions … ahhh, heaven!

Parmesan Baby Potatoes with Sweet Onions

Taters

I love a good trick … a shortcut, especially when it comes to cooking. This is one of my go-to side dishes that always gets rave reviews and best of all it’s easy if you know the trick!

Potatoes are perhaps the most ubiquitous of side dishes, we bake them, we fry them. we mash them, we cook them in almost every imaginable way … this is Poppy’s version.

It starts with baby potatoes, most of the time I just buy a 24 oz. bag of Klondike Gourmet petite potatoes from our local Shop N’ Save. If you calculate the cost per ounce, it’s not the cheapest option, but it is the easiest. It’s easy because they are small and except for the largest ones, don’t require any dicing. Most days, I’m all about easy!

More-taters


The trick, what’s this trick you speak of Poppy?


OK, it’s very simple, we want these little guys tasty, we want them buttery, we want them crispy, but we don’t want to have to deep fry them or cook them for a long time. So the trick is to … drum roll please … pre-cook them in the microwave!

Spread out our little potato friends on 2 or 3 folded wet paper towels on your microwave dish, top them with a few more layers of wet paper towels and cook them for 7-8 minutes.

While they are cooking melt 4 to 6 tablespoons of butter in a large skillet and cut a medium size sweet onion into large chunks ( ⅜ to ½ inch ).

Since these potatoes are a side dish, chances are you have several other things going on. It doesn’t hurt to keep the potatoes in the microwave while you are multitasking. They will stay warm and not dry out sandwiched between the wet paper towels.

When it’s time to finish them, turn the heat up on your skillet, add the potatoes and onions, stirring occasionally. Since the potatoes are precooked, all we need to do now is make sure they get crispy skins and the onions get cooked. (Did I mention this smells delicious?)

When the potato skins start to crisped and the onions are cooked, add a little seasoned salt, some coarse ground black pepper, then grab your block of good parmesan cheese and grate it over the potatoes.

Badda Bing, Badda Boom … tasty, delicious potatoes!

Get a “wedgie”, Wedge Salad that is!

GreenLeafSalad

True confession time… I love cooking, but I’m easily bored if I feel like I’m making the same thing over and over again. Poppy’s “go-to salad” is well received and lends itself to subtle variations, but I’ve made it at least a bazillion times. (OK, maybe that’s a slight exaggeration)

I was looking to do something a little different that would make a good presentation, quick to assemble and tasty.

This is Poppy’s take on the wedge salad –

First an editorial comment on lettuce … I’m sure there’s a more boring vegetable than iceberg lettuce, but I can’t think of one right now. Even our humble Ferguson Shop N’ Save has a good variety of lettuces to choose from … don’t be boring people!

For this salad I grabbed a head of green leaf lettuce. It was a good-sized head so quartering it yielded an ample serving for everyone.

I wanted a warm dressing for this salad. Bacon drippings are the common ingredient for warm dressings but I didn’t want to go to the trouble of cooking bacon. Fortunately I’ve been cooking bacon in the oven on a foiled-lined baking sheet for several years now and made it a practice to keep a ceramic bowl in the freezer to receive the hot drippings. The frozen bacon drippings come in handy for a lot of things.

With a sturdy knife I chiseled out a few good chunks of solid bacon drippings and started melting them in a small saucepan. To convince myself that I was eating healthy, I mixed in an equal amount of EVOO to dilute the fat content, without losing too much of the flavor.

Next in the saucepan went several tablespoons of Julienne cut sun-dried tomatoes packed in olive oil.

I let them simmer for a few minutes and gave them time to get acquainted with the bacon drippings and olive oil.

While they were sharing secrets and flavors, I took the opportunity to grate some parmesan cheese.

After drizzling the lettuce with the warm dressing, I topped it with a little coarse ground black pepper and the grated parmesan.

Guaranteed  the best “wedgie” you’ve ever had!

EasyTastyHealthy

If you do have time to cook up some bacon, a little crumbled on top of this salad would be divine!

K.I.S.S. (Keep It Simple, Stupid)

Grilled-Veggies

K.I.S.S. (Keep It Simple, Stupid) … The KISS principle states that most systems work best if they are kept simple rather than made complicated; unnecessary complexity should be avoided. This principle works in most day-to day issues, and certainly in cooking!

This simple recipe combines two very basic (and simple) items … cast iron and fresh veggies.

I have come to love cast iron cooking utensils. There is much to love about cast iron … stovetop to oven, no problem … teflon and other mystery chemicals, not in cast iron … heat convection and retention, you bet … need to bonk a burglar or zombie over the head, look no further than a cast iron skillet!

My oldest cast iron skillet is handed down from my mother, who will turn 100 in four months. I have no idea how old the skillet is, she could have inherited it from her mother, yes it’s that durable!

Mom

The skillet I used for these grilled veggies is much newer, and ribbed. The ribbing has two main benefits, it gives your food a great restaurant quality seared appearance,  and keeps any fats away from the meat you are cooking.

Ribbed skillet

Tonight I wasn’t grilling meat, just yellow squash and zucchini. I sliced the squash on the diagonal about a ¼” inch thick, brushed the slices with EVOO and placed on the hot skillet. When the squash slices start to turn translucent, with a good sear on the bottom. its time to flip them over. I finished with a simple grind of black and red pepper and a little sea salt. Simple and delicious.

Tonight the grilled squash was paired with whole grain angel hair pasta with basil pesto and sun-dried tomatoes. (not shown because it tasted much better than it photographed)

Hey, keep it simple … stupid!

Summertime Greek Salad

SummerGreekSalad1

Summer has finally arrived in famous Ferguson. The past month has seen several of us flipping to the book of Genesis looking up plans to build an ark, but today was hot and steamy like we would expect a July day to be in the midwest. Unfortunately a month of rainy days and a lack of sun resulted in an unprecedented crop of mildew on the clapboards and beadboard underneath the  front porch roof that runs the entire length of our 1890 home.

So Poppy spent the day removing shutters and furniture from the porch, then armed with a 5 gallon bucket filled with a bleach-water-detergent mixture, a pressurized sprayer loaded with the same, a deck brush, safety goggles, while dressed in the oldest, rattiest clothes I could find, commenced doing battle with the mildew.

By late afternoon, Poopy had won, the mildew was banished and I was famished!

Porch

What to make … it had to be cool, it had to be tasty, it had to be easy!

Enter Poppy’s take on the Greek salad with some summertime touches.

A bed of baby spinach provided the foundation, followed by chunks of cold peeled cucumber, diced ripe tomatoes, halved Kalamata olives, cubes of seedless watermelon all drizzled with Extra Virgin Olive Oil mixed with a little garlic salt and pepper then topped with crumbled feta cheese. I served the salad with strips of lightly toasted naan bread.

The resulting flavors and freshness were the perfect end to a day that had me thinking about the joys of condo ownership more than once.

(tip: if your olives were packed in olive oil, use some of that oil for extra flavor)

SummerGreekSalad2

EasyTastyHealthy

Roasted Asparagus-Potato-White Cheddar Soup

MrsG-Soup

“I’m here to apply for that soup tester job”

I thought I would be clever and use the fading azaleas as a backdrop for this soup that features another plant associated with spring, asparagus … but I got photo bombed by “Mrs. G”, the feral cat who has adopted us. I set everything up, pressed the button on my phone then BAM, up pops up Mrs. G … photo bombed by a cat! Why “Mrs. G” you ask, well we got tired of calling her, “that grey cat”. She is a sweet little thing for a feral cat and a fierce hunter. I’ve lost track of the number of dead mice and moles that have been deposited on our front door mat. OK, enough talk of dead rodents, let’s talk about something much better … potato soup with roasted asparagus and sharp white cheddar cheese.

I’m a bit of a slow learner but I’ve figured out over the years how to make my dishes taste good. Now I’m on to the next phase, learning how to make things taste good and be healthy at the same time (not easy for me). Normally I would add cream or at least half-in-half to add some brightness and creaminess to this soup, but in a nod towards fewer calories and a little weight loss for yours truly, I skipped the cream this time.

I started roasting the asparagus first, so I could be peeling and dicing the potatoes while the asparagus was in the oven. After snapping off the hard ends, I coated the asparagus with EVOO and placed it on a foil lined cookie sheet, and popped it into the oven that had been preheated to 385°. I let that cook for about 15 minutes (set on convection, your mileage may vary), then flipped the asparagus over and cooked for another 10-15 minutes (you really can’t mess this up). While the asparagus was cooking, I peeled 6 medium sized Yukon Gold potatoes and plopped them into 48 ozs. of low sodium chicken broth and commenced cooking. If you’re feeling ambitious you can create your own chicken broth, but I’m not that ambitious. While all of that is happening I diced 3/4’s of a good sized sweet onion and started sautéing that in a little EVOO. Once the onion turned translucent I added 4 cloves of garlic that had been run through my garlic press.


When your culinary planets have aligned, the potatoes are tender, the onion-garlic mix is ready and the asparagus has finished roasting, it’s time to assemble all the ingredients.

Add the onion-garlic mixture to the potato-broth mixture then in batches puree 3/4’s of the soup in a blender. I like a little “chunkiness” to my potato soups, so I don’t puree the whole thing. I’ve got to add my usual warning here … don’t fill up the blender more than halfway and keep you hand on top of the blender to avoid a hot-soup explosion. 

Add 4 ozs. of grated sharp white cheddar, a tsp. of coarse ground black pepper, 4 dashes of Frank’s hot sauce, a scant tsp. of Cajun seasoning, then simmer an additional 10 minutes on low heat (covered) to let all the flavors have a chance to get acquainted. Cut up the asparagus in 1″ slices, adding half to the soup, reserving the other half for topping.

Very tasty … and at least semi-healthy!


Ingredients: 

  • 48 ozs. of low-sodium chicken broth
  • 6 medium Yukon Gold potatoes
  • 4 ozs. of grated sharp white cheddar ( yellow will work too)
  • 1 bunch asparagus
  • 3/4’s of a large sweet onion
  • 4 cloves of garlic
  • 4 dashes of Frank’s hot sauce
  • 1 scant tsp. Cajun seasoning
  • coarse ground black pepper to taste

IMG_2390

Roasted Corn Salsa !

CornSalsa4

Woot, back to cooking! This one is a keeper! It’s been awhile since I’ve posted a recipe, lately I’ve done more “musing” than cooking.

My go-to side dish with my chicken enchiladas is normally a simple refried bean-black bean concoction. It’s tried and true and will continue to be a staple, but when fresh bi-color corn first starts to appear in the grocery store, I can’t pass it by. This truly is, “easy-tasty-healthy”!

EasyTastyHealthy

If you have followed Poppy at all, you know I’m a big fan of roasting vegetables. Roasting pumps up the flavor quotient without adding a lot of extra seasoning … let’s get started … I’m starting to salivate just thinking about this. If my family is any indication, plan on at least 1 ½ ears of corn per person (minimum). I’m a bit of a slow learner, but I’ve figured out that if I hold the ears of corn upright in a very large bowl to cut the kernels off, they don’t jump all over the countertop and I don’t have to transfer them to another container to toss in EVOO.

CornSalsa2

Being the brilliant readers that you are, you’re a step ahead of me and have figured out  the first step is cutting the kernels off the cob. Once done, drizzle enough EVOO over the corn to coat the kernels after a good tossing. Transfer them to a baking sheet covered in foil and lightly coated with EVOO and place them in the oven preheated to 375.

CornSalsa3

While they are starting to roast, dice an avocado into ¼” cubes. Next start dicing the grape tomatoes. I was lucky enough to find a pint containing a variety of various color grape tomatoes, but any kind will do.

Check on the roasting corn, plan on tossing it after 10-15 minutes in the oven. The goal is to end up with corn that is roasted and slightly browned but not burnt. Once the corn is pleasantly roasted, transfer to the bowl you used to cut the kernels off. Add the diced tomatoes and avocado in proportions that you find pleasing. Cooking for 3, I used 5 ears of corn, most of a small avocado and about ½ pint of the grape tomatoes … your mileage may vary 😉

CornSalsa1

Combine the roasted corn, avocado, tomatoes with some fresh chopped cilantro, a generous grind of coarse black pepper, a squeeze of lemon juice and a pinch of Cajun seasonings … toss and you are ready to go!


Ingredients: 

  • fresh corn
  • grape tomatoes
  • avocado
  • cilantro
  • coarse ground black pepper
  • lemon juice
  • Cajun seasoning


Roasted Corn-Potato-Cheddar Soup

RoastedCornPotato2

Life is filled with disappointments. That’s why they call it life … and in the big picture my little disappointment today doesn’t even move the needle. In fact you know it’s been a good day when the biggest disappointment you have is going to the grocery store to get some fresh corn only to find out you have to settle for frozen (Yes, I know, it’s a 1st world problem)!

The good news is that you can make some darn good soup using frozen corn, so let’s get started.


Difficulty: If you can dice potatoes without dicing fingers, you’re golden!

Ingredients: 

  • 48 ozs. of low-sodium chicken broth
  • 6 medium Yukon Gold potatoes
  • 4-5 ozs. of grated sharp cheddar (yellow or white, both work well)
  • 12 ozs. frozen yellow & white corn
  • 1/2 pint of cream
  • 4-6 cloves of garlic
  • 2 tsp. butter
  • 1 tsp. hot sauce
  • coarse ground black pepper to taste

Peel and dice the potatoes into 1/4″ cubes and plop them into your stock pot with chicken broth. Bring the broth to a boil and cook until the potatoes are soft. In the meantime defrost the frozen corn and toss in EVOO, then place on a foil lined cookie sheet along with the butter and roast at 350° for 15-20 minutes, then toss and continue roasting until they start to brown. Once the potatoes are soft, transfer 2/3 of them along with the broth to a blender and purée until creamy ( do not fill the blender all the way up, allow room for expansion of the hot broth-potato mixture … you have been warned). Return the creamy potatoes to the stock pot and add the roasted corn, cream, grated cheddar cheese, coarse ground pepper, garlic (that has been run through a garlic press or finely chopped) and hot sauce.

Simmer for 5-10 minutes then serve with some crusty bread and enjoy.

Yes, it’s that easy (and delicious)!

Orzo, Spinach, Lemon and Chicken Soup

ChickenOrzoLemonSpinachSoup

This savory soup has been known to chase away the blues, sniffly noses and mulligrubs! It takes less time to prepare than any other soup I make, has a fresh pick-me-up flavor (courtesy of the lemon juice), is healthy (no cream in this baby), and I believe could be made gluten-free just by substituting rice for the orzo. What are you waiting for? Quick, run to the kitchen and start cooking!

This soup was inspired by a recipe from the “New England Soup Factory Cookbook“, if you are going to have only one soup cookbook, it should be this one. Of course Poppy has to modify everything at least a little … so here is Poppy’s version!


Difficulty: easy-peasy!

Ingredients:

  • 8 cups low sodium chicken stock
  • (1) rotisserie chicken (pulled into smallish pieces)
  • ¾ cup orzo
  • 3 eggs (lightly beaten)
  • 2 lemons (juiced)
  • 6 ozs. baby spinach (coarsely chopped)
  • garlic salt to taste
  • 1 tsp. coarse ground black pepper (or to taste)

EasyTastyHealthy

Bring the chicken broth to a boil in your stock pot on high heat. Add the orzo, reduce the heat to medium, keeping a slow boil and cook for 5-6 minutes. Once the orzo is done, drizzle in the beaten eggs, stirring constantly until the eggs have cooked into threads. Add the chicken meat, spinach, garlic salt, pepper and ½ of the lemon juice. Why only ½ of the lemon juice, Poppy? Because all lemons are not created equal, this is where you start tweaking …(tweaking, not twerking, don’t get the two confused). Slowly add more of the lemon juice and black pepper until you get the taste you want. You can always add more lemon juice but you can’t take it out …(not even by twerking)!

ChickenOrzoLemonSpinachSoupPint

Roasted Tomatoes with Mozzarella, Bacon on Linguine

RoastedTomatoMozze

We just set our clocks forward, spring training baseball is finally here and the Catholic church next to our home is holding Lenten fish fries … all harbingers of spring in my book and I can’t wait! Maybe that’s why I was jonesing for some homegrown tomatoes as I was wandering around the produce section of our local grocery store. Of course there were none to be had so I grabbed the closest thing I could find … tomatoes packaged with the vines still intact … it may just be a marketing ploy, but it worked on me.

Tomatos

Now that I had them, what to do next? To avoid the potential disappointment of serving them raw and having them taste nothing like the home-grown varieties I was longing for … I decided to roast them. You really can’t go wrong with roasting vegetables.

I completed my rounds through the grocery store and grabbed everything I thought would go well with the roasted tomatoes that were running through my brain … fresh mozzarella, bacon, linguine, capers, garlic … check-check-check. Am I the only one that goes into the grocery store without a plan and aimlessly wanders around until I come up with an idea? I hope not!

After getting home I sliced the tomatoes in half around their equator and cut out just a bit out of the center. They got popped in the oven on a foil wrapped (and generously oiled) baking sheet. Along with them went the bacon also on a foil wrapped baking sheet. A co-worker clued me in on baking bacon and it’s the best … cooks evenly and when you’re done simply remove the foil and place your clean baking sheet back in the cabinet. In this case the oven was set to 385° on convection mode … your mileage and cooking times may vary. The bacon finished long before the tomatoes, so I removed it, transferred the strips to dry on some paper towels and scooped up a couple of teaspoons of bacon drippings before I pitched the foil. The bacon drippings were added to a skillet along with 3 tbsp. of butter, 2 tbsp of EVOO, 3-4 tsp of capers and 4 large cloves of garlic that had been finely chopped. This mixture was simmered on low heat until the garlic started to brown.

While this is going on the tomatoes are still merrily roasting in the oven, after about 35-40 minutes I removed them for the next stage. Slice the ball of mozzarella into ¼ thick slices and place on top of the partially roasted tomatoes. If necessary trim the cheese slices so they don’t hang too far over the sides of the tomatoes. Top the mozzarella with bacon pieces and place back in the oven.

TomatosBacon
Ready to go back in the oven!


The linguine is going to take 9-10 minutes to cook, so start that after the tomatoes have been in the oven an additional 5 or so minutes. At this point switch your oven to broil to get that nice slightly browned finish to the cheese. Once the cheese achieves that state, turn off the oven but leave the tomatoes in until everything else is ready. Drain the linguine and toss in the skillet with you butter-garlic-caper sauce and top with a generous grind of coarse black pepper. Place the roasted tomatoes on top of the pasta along with a sprinkle of fresh or dried parsley.

I was preparing this for 4 servings so I used about 12 ozs. of pasta, obviously if you need more or less servings, everything else scales accordingly.

My families input afterwards … more tomatoes, less pasta … I will keep that in mind because we will be doing this again!

Another roasted tomato recipe